Thursday, January 13, 2022

Red Eye


Fixing Red Eye


How to Use the Red Eye Tool in Photoshop 

To quickly remove red eyes in photos:

  1. Open the photo and zoom in on the red eyes.

    Open the photo and zoom in on the red eyes.
  2. Click and hold the Healing Brush tool and select Red Eye Tool at the bottom of the list.

    Click and hold the Healing Brush tool and select Red Eye Tool at the bottom of the list.
  3. Click on the reds eyes and watch them turn to normal.

    Increase the Pupil Size in the tool options bar to widen the area the tool will be applied to. Adjust the Darken Amount to lighten or darken the result.

    Click on the reds eyes and watch them turn to normal.

How to Manually Remove Red Eyes in Photoshop

If you want more control over how the final result looks, you can also remove red eyes manually:

  1. Open the photo and zoom in on the red eyes.

    Open the photo and zoom in on the red eyes.
  2. Click and hold the Eyedropper tool and select Color Sampler Tool.

    Click and hold the Eyedropper tool and select Color Sampler Tool.
  3. Click on an area of the iris where you can see a hint of the natural color.

    Click on an area of the iris where you can see a hint of the natural color.
  4. Click and hold the Brush tool and select Color Replacement Tool.

    Click and hold the Brush tool and select Color Replacement Tool.
  5. Paint over the red parts of the eyes.

    Use the eraser tool to clean up any overspray from painting outside the iris. If you want to darken the pupil area, use the Photoshop Burn tool.

    Paint over the red parts of the eyes.
  6. Select Filters > Blur > Gaussian Blur.

    Select Filters > Blur > Gaussian Blur.
  7. Set the Radius to 1 pixel and select OK to soften the edges of the painted area on the layer.

    Set the Radius to 1 pixel and select OK to soften the edges of the painted area on the layer.

Once satisfied with the result, you can save the file as a PSD file or in your preferred image format.

Tuesday, January 11, 2022

Whiten Teeth

 Assignment for Wednesday. 1/12- Whiten all of the teeth picutres in the "WHITEN TEETH"  folder in your tvstudio class folder.  They are due by the end of the period. 

How To Whiten Teeth In Photoshop - Quick Summary


The picture is in your tv studio "whiten teeth " folder called ORIGINAL


FULL TUTORIAL BELOW: 

The original photo before whitening the teeth

The original image. Credit: Adobe Stock.

If I zoom in for a closer look, we see some yellow in the teeth, especially with the man on the left. Both people's teeth could also use some brightening. We can do both of these things (whiten and brighten teeth) using a single Hue/Saturation adjustment layer:
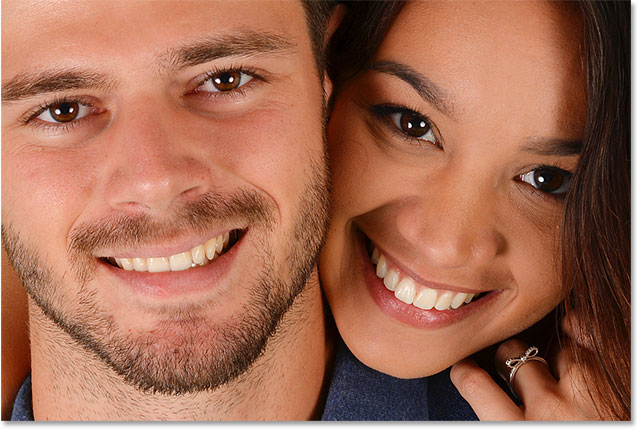
A close-up of the yellow teeth in the photo

Both people's teeth could be whiter and brighter.


How To Whiten Teeth In Photoshop

Step 1: Select The Polygonal Lasso Tool or the Lasso Tool

Start by drawing a selection around the teeth. Select the Lasso Tool from the Toolbar:
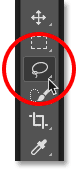
Selecting the Lasso Tool from the Toolbar in Photoshop.

Selecting the Lasso Tool.

Step 2: Draw A Selection Around The Teeth

If you're working on a photo with two or more people in it, as I am here, you may be tempted to select and whiten everyone's teeth at once. But the problem is, everyone's teeth are different and usually need different amounts of whitening. You'll get better results by whitening one person's teeth at a time. I'll start with the man on the left.

Draw a selection around the teeth. Don't worry if it's not the most accurate selection because we can easily clean it up later. Just trace around the teeth, staying as close to the edges as possible:
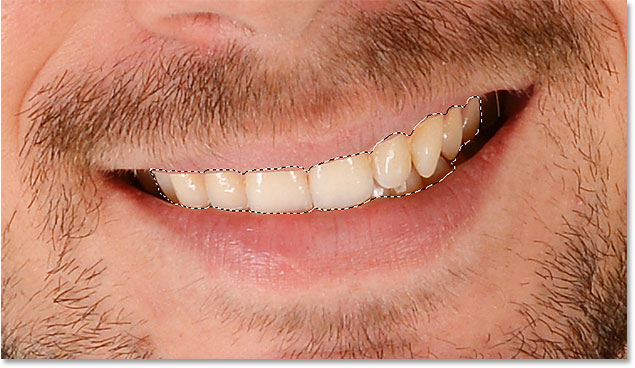
Selecting the teeth with the Lasso Tool in Photoshop

Drawing a selection outline around the teeth with the Lasso Tool.

**You will outline the teeth point by point.  If you make a mistake, hit your DELETE key on your keyboard, it will delete one point at a time.   (You won't have to start over)

Step 3: Add A Hue/Saturation Adjustment Layer

Click the New Fill or Adjustment Layer icon at the bottom of the Layers panel:
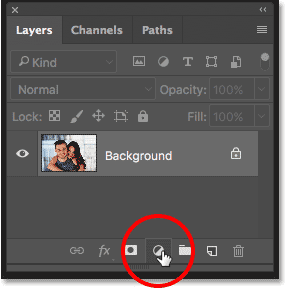
Clicking the New Fill or Adjustment Layer icon in the Layers panel in Photoshop

Clicking the New Fill or Adjustment Layer icon.

Choose Hue/Saturation from the list:
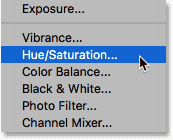
Adding a Hue/Saturation adjustment layer to use for whitening the teeth.

Selecting a Hue/Saturation adjustment layer.

A Hue/Saturation adjustment layer appears above the Background layer:
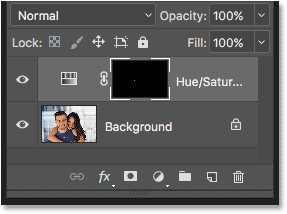
The Layers panel showing the Hue/Saturation adjustment layer.

The adjustment is added above the image.

Step 4: Change The Edit Option To Yellows

The controls and options for the Hue/Saturation adjustment layer are found in Photoshop's Properties panel. By default, Hue/Saturation affects all colors in the image equally, and that's because the Edit option is set to Master:
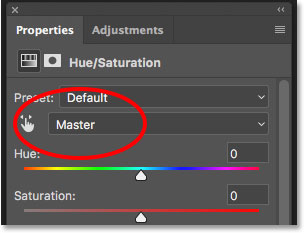
The Edit option for the Hue/Saturation adjustment layer is set to Master

The Edit option is set to Master by default.

To edit only the yellows in the image so we can remove the yellow from the teeth, change the Edit option to Yellows:
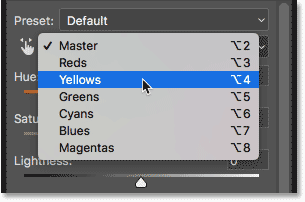
Changing the Hue/Saturation Edit option from Master to Yellow

Changing the Edit option from Master to Yellows.

Step 5: Lower The Saturation Of The Yellow

Click on the Saturation slider and begin dragging it to the left. The further you drag, the more you'll desaturate the yellow in the teeth, making them whiter. Keep in mind, though, that teeth naturally have some yellow in them. If you drag the Saturation slider all the way to the left, as I'm doing here:
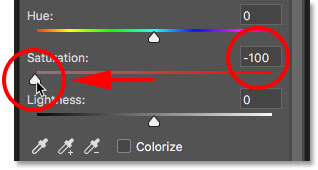
Dragging the Saturation slider for the Hue/Saturation adjustment layer

Dragging the Saturation slider to -100.

You'll remove the yellow completely, resulting in teeth that look dull and lifeless:
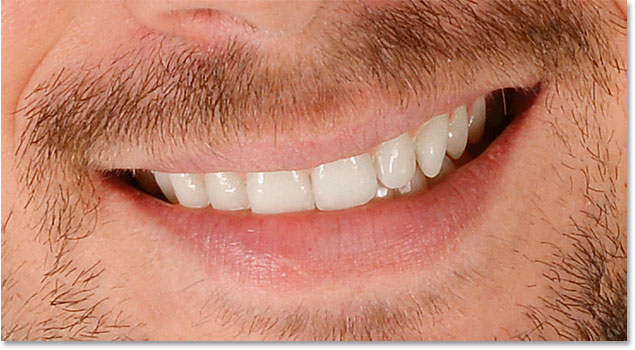
The image with too much yellow removed from the teeth, making the teeth look fake

Grayish-white is not a healthy look for teeth.

Instead, keep an eye on your image as you drag the slider and leave just enough yellow to keep the teeth looking natural. The setting you need will depend on how yellow the teeth were to begin with. For my image, a Saturation value of around -80 works well:
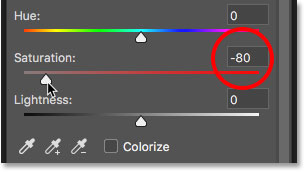
Dragging the Saturation slider to restore some of the yellow in the teeth.

Dialing back the Saturation value.

Whitening The Teeth: Before And After

To better judge the results, compare the whitened version of the teeth with how they looked originally. In the Layers panel, click the Hue/Saturation adjustment layer's visibility icon. Click it once to temporarily hide the effects of the adjustment layer and view the original image. Click it again to turn the adjustment layer back on and view the whitened version:
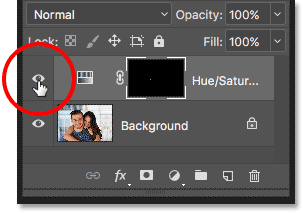
Clicking the Hue/Saturation adjustment layer's visibility icon in the Layers panel.

Toggling the adjustment layer on and off with the visibility icon.

Here's a before-and-after comparison showing the improvement so far. The left half of the teeth are how they looked originally. The right half are how they look after removing most (but not all) of the yellow:
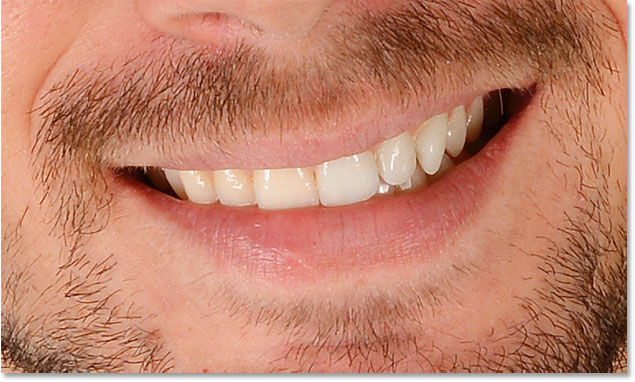
A before and after comparison after removing the yellow in the teeth to whiten them in Photoshop

A before (left) and after (right) comparison of the teeth whitening.

Step 6: Change The Edit Mode Back To Master

We've whitened the teeth, so now let's brighten them. Change the Edit option in the Properties panel from Yellows back to Master so we can adjust all colors at once, not just the yellows:

Changing the Hue/Saturation Edit option back to Master.

Setting Edit back to Master.

Step 7: Drag The Lightness Slider To Brighten The Teeth

Click the Lightness slider and begin dragging it towards the right. The further you drag, the lighter the teeth will appear. Keep an eye on your image as you drag the slider so you don't brighten them too much. For my image, a Lightness value of around +20 works well:
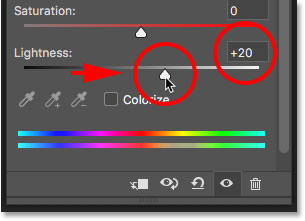
Increasing the Lightness value in Hue/Saturation to brighten the teeth.

Increasing Lightness to brighten the teeth.

The teeth are now looking brighter. But depending on how accurate you were when selecting the teeth with the Lasso Tool, you may notice some areas around the teeth that have also been brightened. In my case, there's some unwanted brightening in the lips and gums along the top and bottom of the teeth. We'll clean up these areas next:
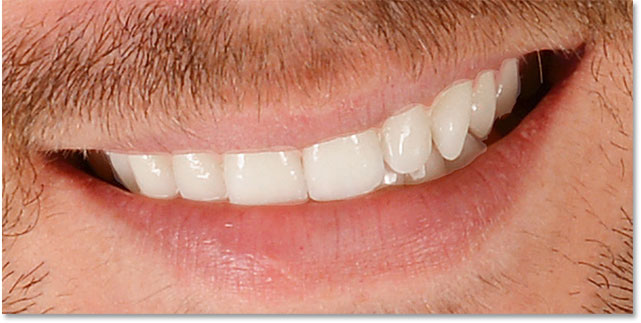
The teeth have been whitened but areas around them need to be cleaned up.

The teeth have been brightened, but so have areas around the teeth.


8, Whitening Teeth For More People In The Photo

As I mentioned earlier, for best results when whitening teeth for two or more people in the same photo, you'll want to use a separate Hue/Saturation adjustment layer for each person. We've already gone through the details of each step when I corrected the man's teeth, so I'll go through them again quickly here with the woman's teeth just so we can see how to work with multiple adjustment layers in Photoshop.

Selecting The Teeth

First, I'll reselect the Lasso Tool from the Toolbar. You can also select the Lasso Tool by pressing the letter L on your keyboard:

Reselecting the Lasso Tool from the Toolbar.

Reselecting the Lasso Tool.

Then, I'll draw a selection outline around the woman's teeth:
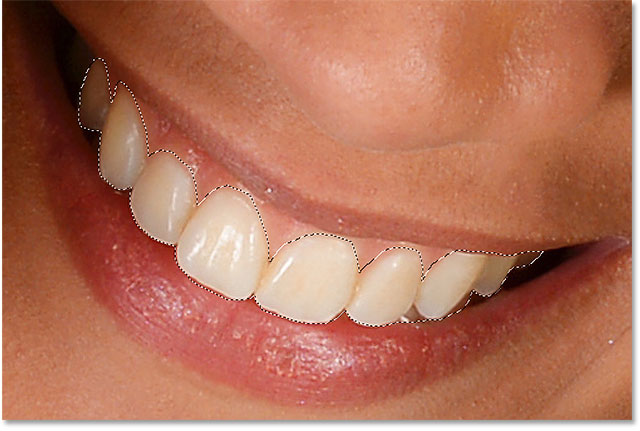
Selecting the teeth with the Lasso Tool in Photoshop

Selecting the woman's teeth with the Lasso Tool.

Adding A New Hue/Saturation Adjustment Layer

I'll click the New Fill or Adjustment Layer icon at the bottom of the Layers panel:
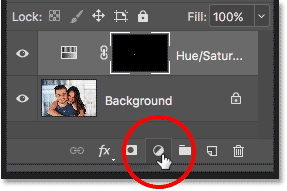
Clicking the New Fill or Adjustment Layer icon in the Layers panel.

Clicking the New Fill or Adjustment Layer icon.

Then I'll once again choose Hue/Saturation from the list:

Adding a separate Hue/Saturation adjustment layer for the woman's teeth.

Adding a separate Hue/Saturation adjustment layer for the woman's teeth.

A second Hue/Saturation adjustment layer is added. The one at the top is the one I'll be using to whiten the woman's teeth. The one below it is the original adjustment layer I used for the man's teeth:
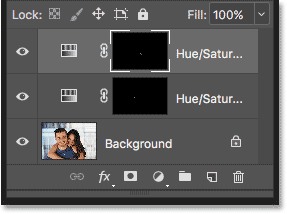
The Layers panel showing two Hue/Saturation adjustment layers.

The second adjustment layer appears above the first one.

Whitening The Teeth

With the second adjustment layer added, the steps for whitening and brightening her teeth are the same as before. In the Properties panel, I'll change the Edit option from Master to Yellows. Then I'll drag the Saturation slider to the left to reduce, but not completely remove, the yellow from her teeth. For the man's teeth, I lowered the saturation to a value of -80. This time, I don't need to go quite that far. A value of around -70 should do it:
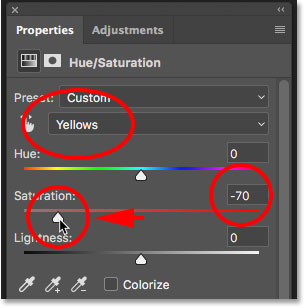
Reducing the yellow in the woman's teeth by lowering the color saturation.

The woman's teeth need less whitening than the man's.

Brightening The Teeth

To brighten her teeth, I'll change the Edit option from Yellows back to Master, then I'll increase the Lightness value by dragging the slider towards the right. Her teeth are already fairly bright so I won't push the Lightness value as far this time. I'll increase it to +10:
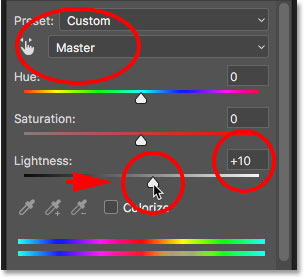
Brightening the woman's teeth by increasing the Lightness value for the Hue/Saturation adjustment layer.

Adding just a hint of brightening with the Lightness slider.


Before And After

And with that, we're done! Both people's teeth are now whiter and brighter. To compare the edited version of the image with the original version, press and hold the Alt (Win) / Option (Mac) key on your keyboard and click the Background layer's visibility icon:
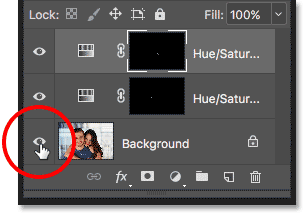
Clicking the Background layer's visibility icon while holding the Alt / Option key.

Clicking the Background layer's visibility icon while pressing Alt (Win) / Option (Mac).

This hides all layers in the document except the Background layer, revealing the original 

photo:

The original image in Photoshop before whitening the teeth.

Viewing the original image for comparison.

To turn the adjustment layers back on, press and hold Alt (Win) / Option (Mac) and click again on the Background layer's visibility icon. And here, after whitening the woman's teeth using a separate adjustment layer, is my final result:
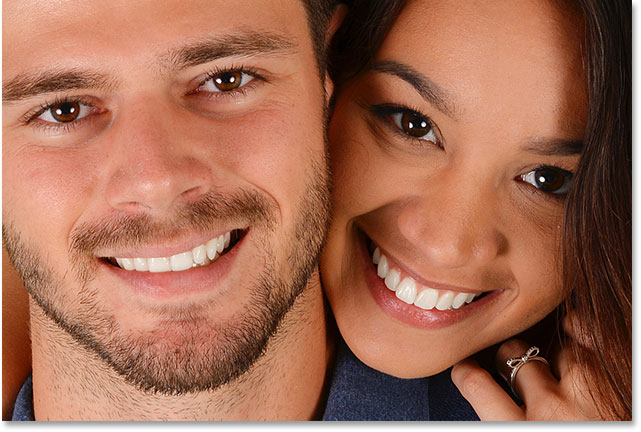
How to whiten teeth in Photoshop


QUICK OVERVIEW OF THE STEPS:

We covered a lot in this tutorial. Here's a quick summary of the steps for how to whiten teeth in Photoshop:

  • 01. First, select the Polygonal Lasso Tool and draw a selection around the teeth.
  • 02. In the Layers panel, click the New Fill or Adjustment Layer icon and choose a Hue/Saturation adjustment layer.
  • 03. In the Properties panel, change the Edit option from Master to Yellows.
  • 04. Drag the Saturation slider to the left to reduce the yellow in the teeth.
  • 05. Still in the Properties panel, change the Edit option from Yellows back to Master.
  • 06.. For images with two or more people, use a separate Hue/Saturation adjustment layer for each person for best results.

Wednesday, January 05, 2022

Changing eye color


Changing eye color


Changing Eye Color

Changing Eye Color
Changing Eye Color In An Image With Photoshop
Did you ever want to know what it would be like to change your eye color?  Today is your lucky day!

1. Get a camera
2. Take a close-up pic of a classmate or have someone take a close-up of you.
3. Use your selected pic to complete the following tutorial......
4. You must change the color of your pic three times....tow normal and one bizarre color!
Save as eye1, eye2, and eye3.


Changing Eye Color In An Image With Photoshop

In this Photo Retouching tutorial, we'll learn a very simple technique for changing someone's eye color in a photo using a Hue/Saturation adjustment layer! Of course, there's no shortage of ways to change colors in an image with Photoshop, but whether you know which color you want to use or just want to play around and experiment, a Hue/Saturation image adjustment makes changing eye color easy, fast and fun!
Download our tutorials as printable PDFs! Learning Photoshop has never been easier!
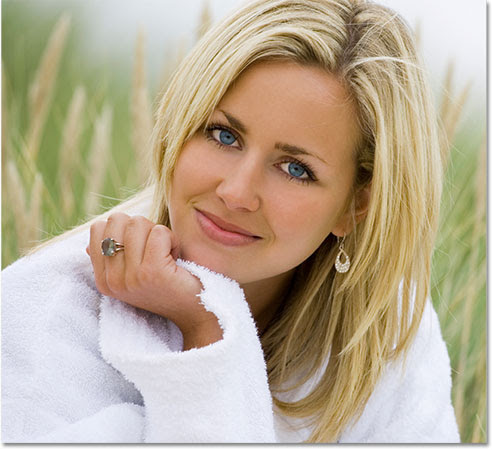
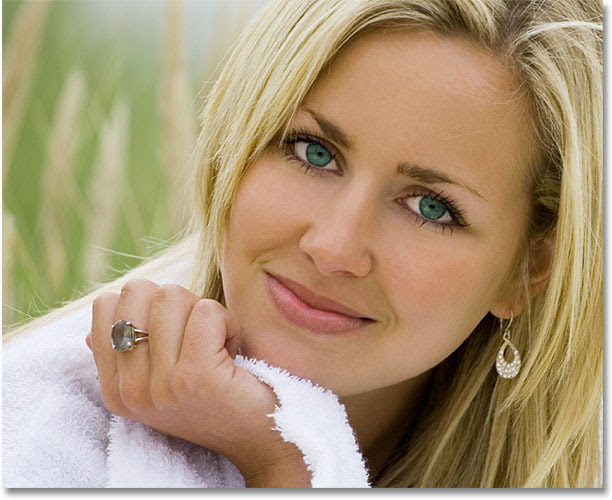
Here's the image I'll be using:
A photo of a woman in a white robe sitting in tall grass. Image licensed from iStockphoto by Photoshop Essentials.com
The original image.
Let's get started!

Step 1: Zoom In On The Eyes

Before we begin, let's make it easier to see what we're doing by zooming in on the eyes in the photo. Select the Zoom Tool from the Tools palette, or press the letter Z on your keyboard to select it with the shortcut:
Selecting the Zoom Tool from the Tools palette in Photoshop. Image © 2010 Photoshop Essentials.com
Select the Zoom Tool.
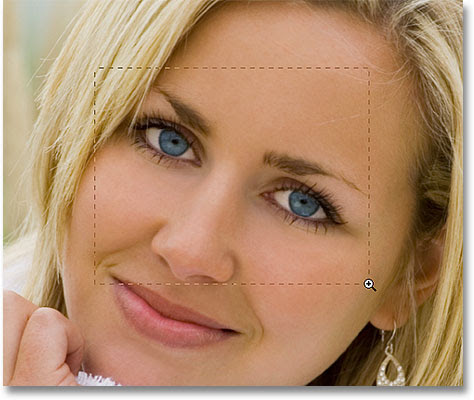
With the Zoom Tool selected, click and drag out a selection box around the eyes. This is the area we'll be zooming in to:
Drawing a selecting around the eyes with the Zoom Tool in Photoshop. Image © 2010 Photoshop Essentials.com
Drag out a selection box around the eyes.
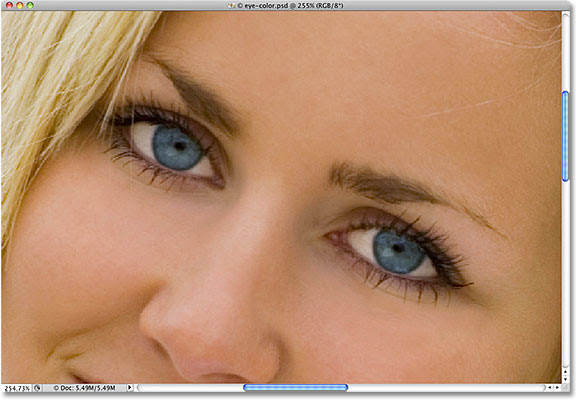
Release your mouse button, and Photoshop fills the document window with the area you selected:
Zooming in on the eyes in Photoshop. Image © 2010 Photoshop Essentials.com
Photoshop zooms in on the selected area.

Step 2: Select The Lasso Tool

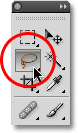
Next, we need to select the eyes so we're not affecting any other areas of the image. For that, we'll use the Lasso Tool. Select the Lasso Tool from the Tools palette, or press the letter L on your keyboard to quickly select it with the shortcut:
Selecting the Lasso Tool from the Tools palette in Photoshop. Image © 2010 Photoshop Essentials.com
Select the Lasso Tool.

Step 3: Draw Selections Around The Eyes

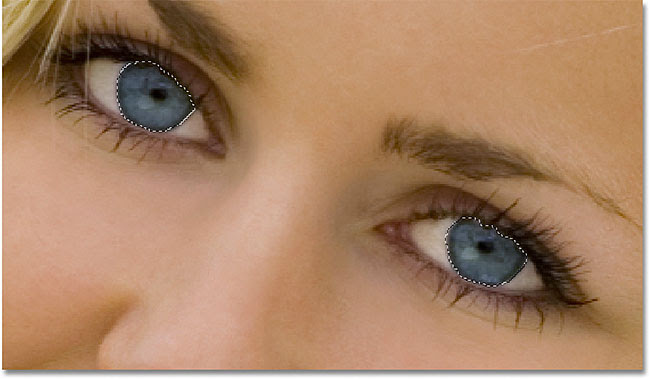
With the Lasso Tool selected, drag a selection around one of the eyes. Don't worry if your selection outline isn't perfect since we'll clean things up later. Once you have the first eye selected, hold down your Shift key and draw a selection around the other eye. Holding down the Shift key will add the new selection to the previous one, allowing us to select both eyes at once:
Drawing selectings around the eyes with the Lasso Tool in Photoshop. Image © 2010 Photoshop Essentials.com
Select the first eye, then hold down Shift and select the other.
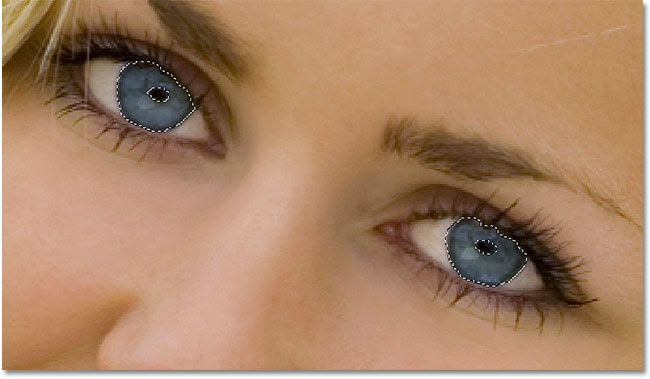
We don't need the pupils in the center of the eyes selected, so let's remove them from the selection. Hold down your Alt (Win) / Option (Mac) key and drag around each pupil with the Lasso Tool. This will remove them from the selection, leaving us with only the colored area selected. Again, don't worry about being overly precise for now:
The pupils have been deselected in the image. Image © 2010 Photoshop Essentials.com
Hold down Alt (Win) / Option (Mac) and drag around the pupils to deselect them.

Step 4: Add A Hue/Saturation Adjustment Layer

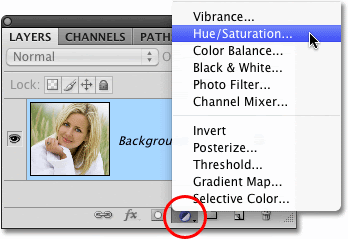
With the eyes now selected, we're ready to change their color! For that, we'll use a Hue/Saturation adjustment layer. Click on the New Adjustment Layer icon at the bottom of the Layers palette (it's the circle split diagonally between black and white), then select Hue/Saturation from the list of adjustment layers that appears:
Selecting a Hue/Saturation adjustment layer in Photoshop. Image © 2010 Photoshop Essentials.com
Click on the New Adjustment Layer icon and choose Hue/Saturation from the list.

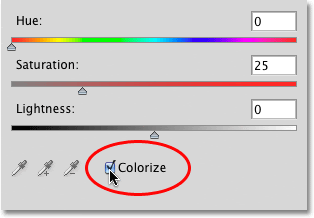
Step 5: Select The "Colorize" Option

If you're using Photoshop CS4 as I am here, the options and controls for the Hue/Saturation dialog box will appear inside the Adjustments Panel which is new to CS4. In Photoshop CS3 and earlier, a Hue/Saturation dialog box will appear on your screen. Select the Colorize option by clicking inside its checkbox:
Selecting the Colorize option for the Hue/Saturation adjustment layer in Photoshop. Image © 2010 Photoshop Essentials.com
Select "Colorize".
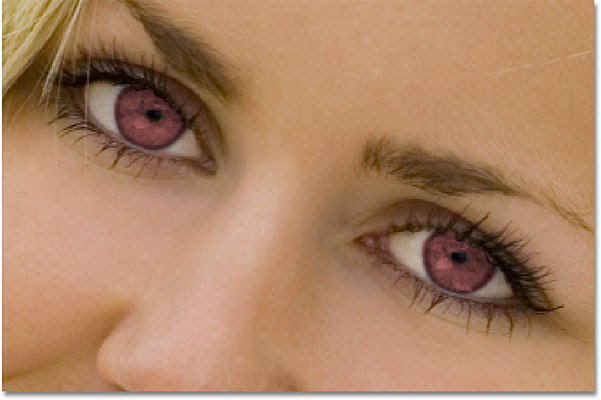
As soon as you select Colorize, you'll see the eyes change color in the document window:
The eyes now appear red after changing their color in Photoshop. Image © 2010 Photoshop Essentials.com
The eyes instantly change color.

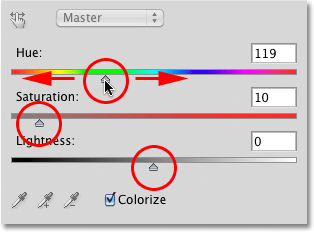
Step 6: Adjust The Hue, Saturation And Lightness

To change the color, simply adjust the Hue, Saturation and Lightness options by dragging their sliders left or right. Hue will change the basic color, Saturation changes the saturation of the color, and Lightness affects the overall brightness. Be careful not to drag the Saturation or Lightness sliders too far to the right, though, since things can quickly become unnatural looking. The image in the document window will continually update as you move the sliders so you can see a live preview of the changes:
Adjusting the Hue, Saturation and Lightness controls. Image © 2010 Photoshop Essentials.com
Dial in the color you want with the Hue, Saturation and Lightness sliders.
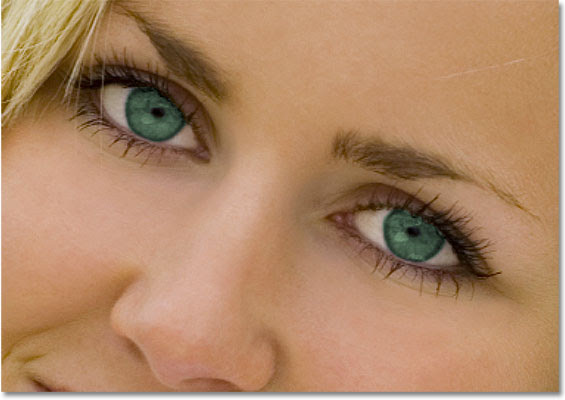
When you're happy with the new color of the eyes, click OK to exit out of the Hue/Saturation dialog box (Photoshop CS4 users can leave the Adjustments Panel open since there's no need to close it). Here's my image after changing the woman's eyes from blue to green:
The eyes now appear green after changing their color in Photoshop. Image © 2010 Photoshop Essentials.com
The Hue/Saturation adjustment makes it easy to select any color you want for the eyes.

Step 7: Select The Brush Tool

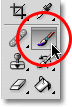
If your initial selection of the eyes with the Lasso Tool wasn't perfect, cleaning things up is as easy as painting with a brush! Select Photoshop's Brush Tool from the Tools palette, or press the letter B to select it with the keyboard shortcut:
Selecting the Brush Tool from the Tools palette in Photoshop. Image © 2010 Photoshop Essentials.com
Select the Brush Tool.

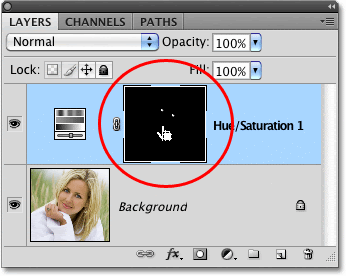
Step 8: Select The Hue/Saturation Layer Mask

If we look in our Layers palette, we see our Hue/Saturation adjustment layer sitting above the image on the Background layer. One of the great things about adjustment layers is that they include a built-in layer mask, which makes it easy to control exactly which areas of the image are affected by the adjustment layer and which are not. All we need to do is paint on the layer mask with our brush, but first, we need to make sure the layer mask is selected. You should see a white highlight border around the layer mask's thumbnail, which means the mask is selected. If you don't see the highlight border, simply click directly on the thumbnail to select the mask:
The layer mask thumbnail for the Hue/Saturation adjustment layer in Photoshop. Image © 2010 Photoshop Essentials.com
Make sure the layer mask for the adjustment layer is selected.

Step 9: Paint On The Mask To Clean Up The Selection

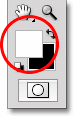
To clean up the eyes, simply paint over any problem areas with your brush. Paint with white to add to the area that the Hue/Saturation adjustment layer is affecting, or with black to hide the effects of the adjustment layer. Photoshop paints using your current Foreground color, which you can see by looking at the Foreground color swatch near the bottom of the Tools palette:
The Foreground color swatch in the Tools palette in Photoshop. Image © 2010 Photoshop Essentials.com
The Foreground color swatch shows the color you're painting with.
With the layer mask selected, press the letter D on your keyboard to reset your Foreground color to white. To quickly switch to black, press the letter X, which swaps the Foreground and Background colors. Press X again to switch back to white.
To change the size of your brush, use the left and right bracket keys on your keyboard. Press the left bracket key ( [ ) repeatedly to make the brush smaller or the right bracket key ( ] ) to make it larger. Press Shift+left bracket to make the brush edges softer if needed, or Shift+right bracket to make them harder.
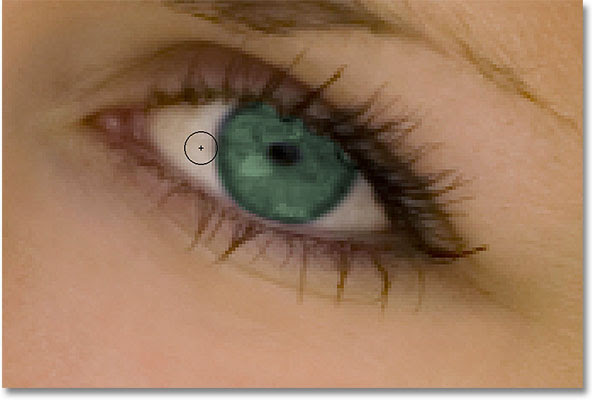
Here, I'm painting around the outer edge of one of the eyes with a small brush, with black as my Foreground color, to hide any areas where the new green color extended out into the white part of the eye:
Painting around the eye with black to hide the Hue/Saturation adjustment layer. Image © 2010 Photoshop Essentials.com
Painting with black on the layer mask to remove any unwanted green areas.
Here, after cleaning up the effect by painting on the layer mask, is my final result:
Changing eye color in a photo with Photoshop. Image © 2010 Photoshop Essentials.com
Her blue eyes are now green. No special contact lenses required.

ASSIGNMENT:
1. Take 8 photos of yourself.  Make sure your eyes are visible and the picture focuses on your eyes.  You should have at least 4 close-ups

2. Import the pics to your Pub File :  Create a folder called EYE COLOR

3. Change the eye color of each pic

4. Call up your BLANK InDesign Page

5. Scroll to a blank page and place all eight photos on the page.  Save it in the EYE COLOR folder

Sunday, January 02, 2022

REVIEW EXERCISE

  REVIEW EXERCISE


1. With your partner, take your assigned camera

2. Each person must take 6 Clean shots that do NOT include people.

*You and your partner must have different pics

3. The shots must be of different subjects.

(EX:  Shots taken in the same classroom, hallway, area willnot count)


4. Go back to my classroom

5. In TVSTUDIO, find your folder and make a new folder called REVIEW PICS

6. Put your original pics in this folder (Use the USB sticks on the cart)

7. Edit those pics

A. Adjust the RGB color

B. Put a title in a box on each pic

C. Make sure your title has a drop shadow.

D. CROP each pic so that it features the central object.....no clutter in background.  (You crop with the ant tool.


-Once you select your main subject, go to IMAGE  nd scroll down to CROP

8. Save each pic by adding EDIT to the end of the original name.

100 points

Friday, December 17, 2021

PHOTOSHOP QUIZ

  Monday, 12/20- Thursday, 12/23

PHOTOSHOP QUIZ    

A.. IN YOUR STUDENT FOLDER IN TV STUDIO, LOCATE THE FOLDER CALLED "PHOTO QUIZ"

B. YOU WILL SEE TWO FOLDERS

3. DIRECTIONS FOR THE "ADJUST LEVELS2" FOLDER

ADJUST  LEVELS 2 FOLDER

-1. MAKE A BACKGROUND COPY OF EACH PIC

-RENAME EACH PIC BY TYPING - EDIT  IN THE "SAVE AS" LINE

-2. ADJUST THE RED, GREEN, AND BLUE LEVELS FOR EACH PIC

3. PUT A FRAME AROUND EACH PIC

4. TYPE A TITLE ON EACH PIC

5. PUT A RECTANGLE/ BOX AROUND EACH TITLE

6. REMEMBER TO SAVE

7. YOU MUST COMPLETE THESE STEPS FOR ALL 10 PICTURES.  100 POINTS


2. Finish working on the pictures in "Adjust Levels folder"
1. MAKE A BACKGROUND COPY OF EACH PIC
-RENAME EACH PIC BY TYPING - EDIT  IN THE "SAVE AS" LINE
-2. ADJUST THE RED, GREEN, AND BLUE LEVELS FOR EACH PIC
3. PUT A FRAME AROUND EACH PIC
4. TYPE A TITLE ON EACH PIC
5. PUT A RECTANGLE/ BOX AROUND EACH TITLE
6. REMEMBER TO SAVE
7. YOU MUST COMPLETE THESE STEPS FOR ALL 4 PICTURES

MAKE SUREALL WORK IS SAVED IN YOUR PHOTO QUIZ FOLDER IN TVSTUDIO


ALL WORK IS DUE BEFORE YOU LEAVE CLASS ON THURSDAY, 12/23